Reviewing registration requests, triaging, and acting
Goal
Review and triage all of the school's registrations from one place (the registrations operations console), search and filter them, then take the right action (approve, reject, confirm payment, transfer, and so on) singly or in bulk.
When do you need this screen?
- To follow up the new requests waiting for your decision.
- To narrow down to a particular set (one activity, or a gender, age range, or status).
- To find a student, parent or registration number quickly.
- To carry out an action on several registrations at once.
Before you start
- You need permission to view the school's registrations. Make sure the right school is selected in the school switcher first.
Where it lives
Sidebar > the Today's work group > Registrations (after choosing the school). You can also reach it from a particular activity's screen, in which case it opens with that activity's filter already applied.
Triage and filter tools (the filter bar)
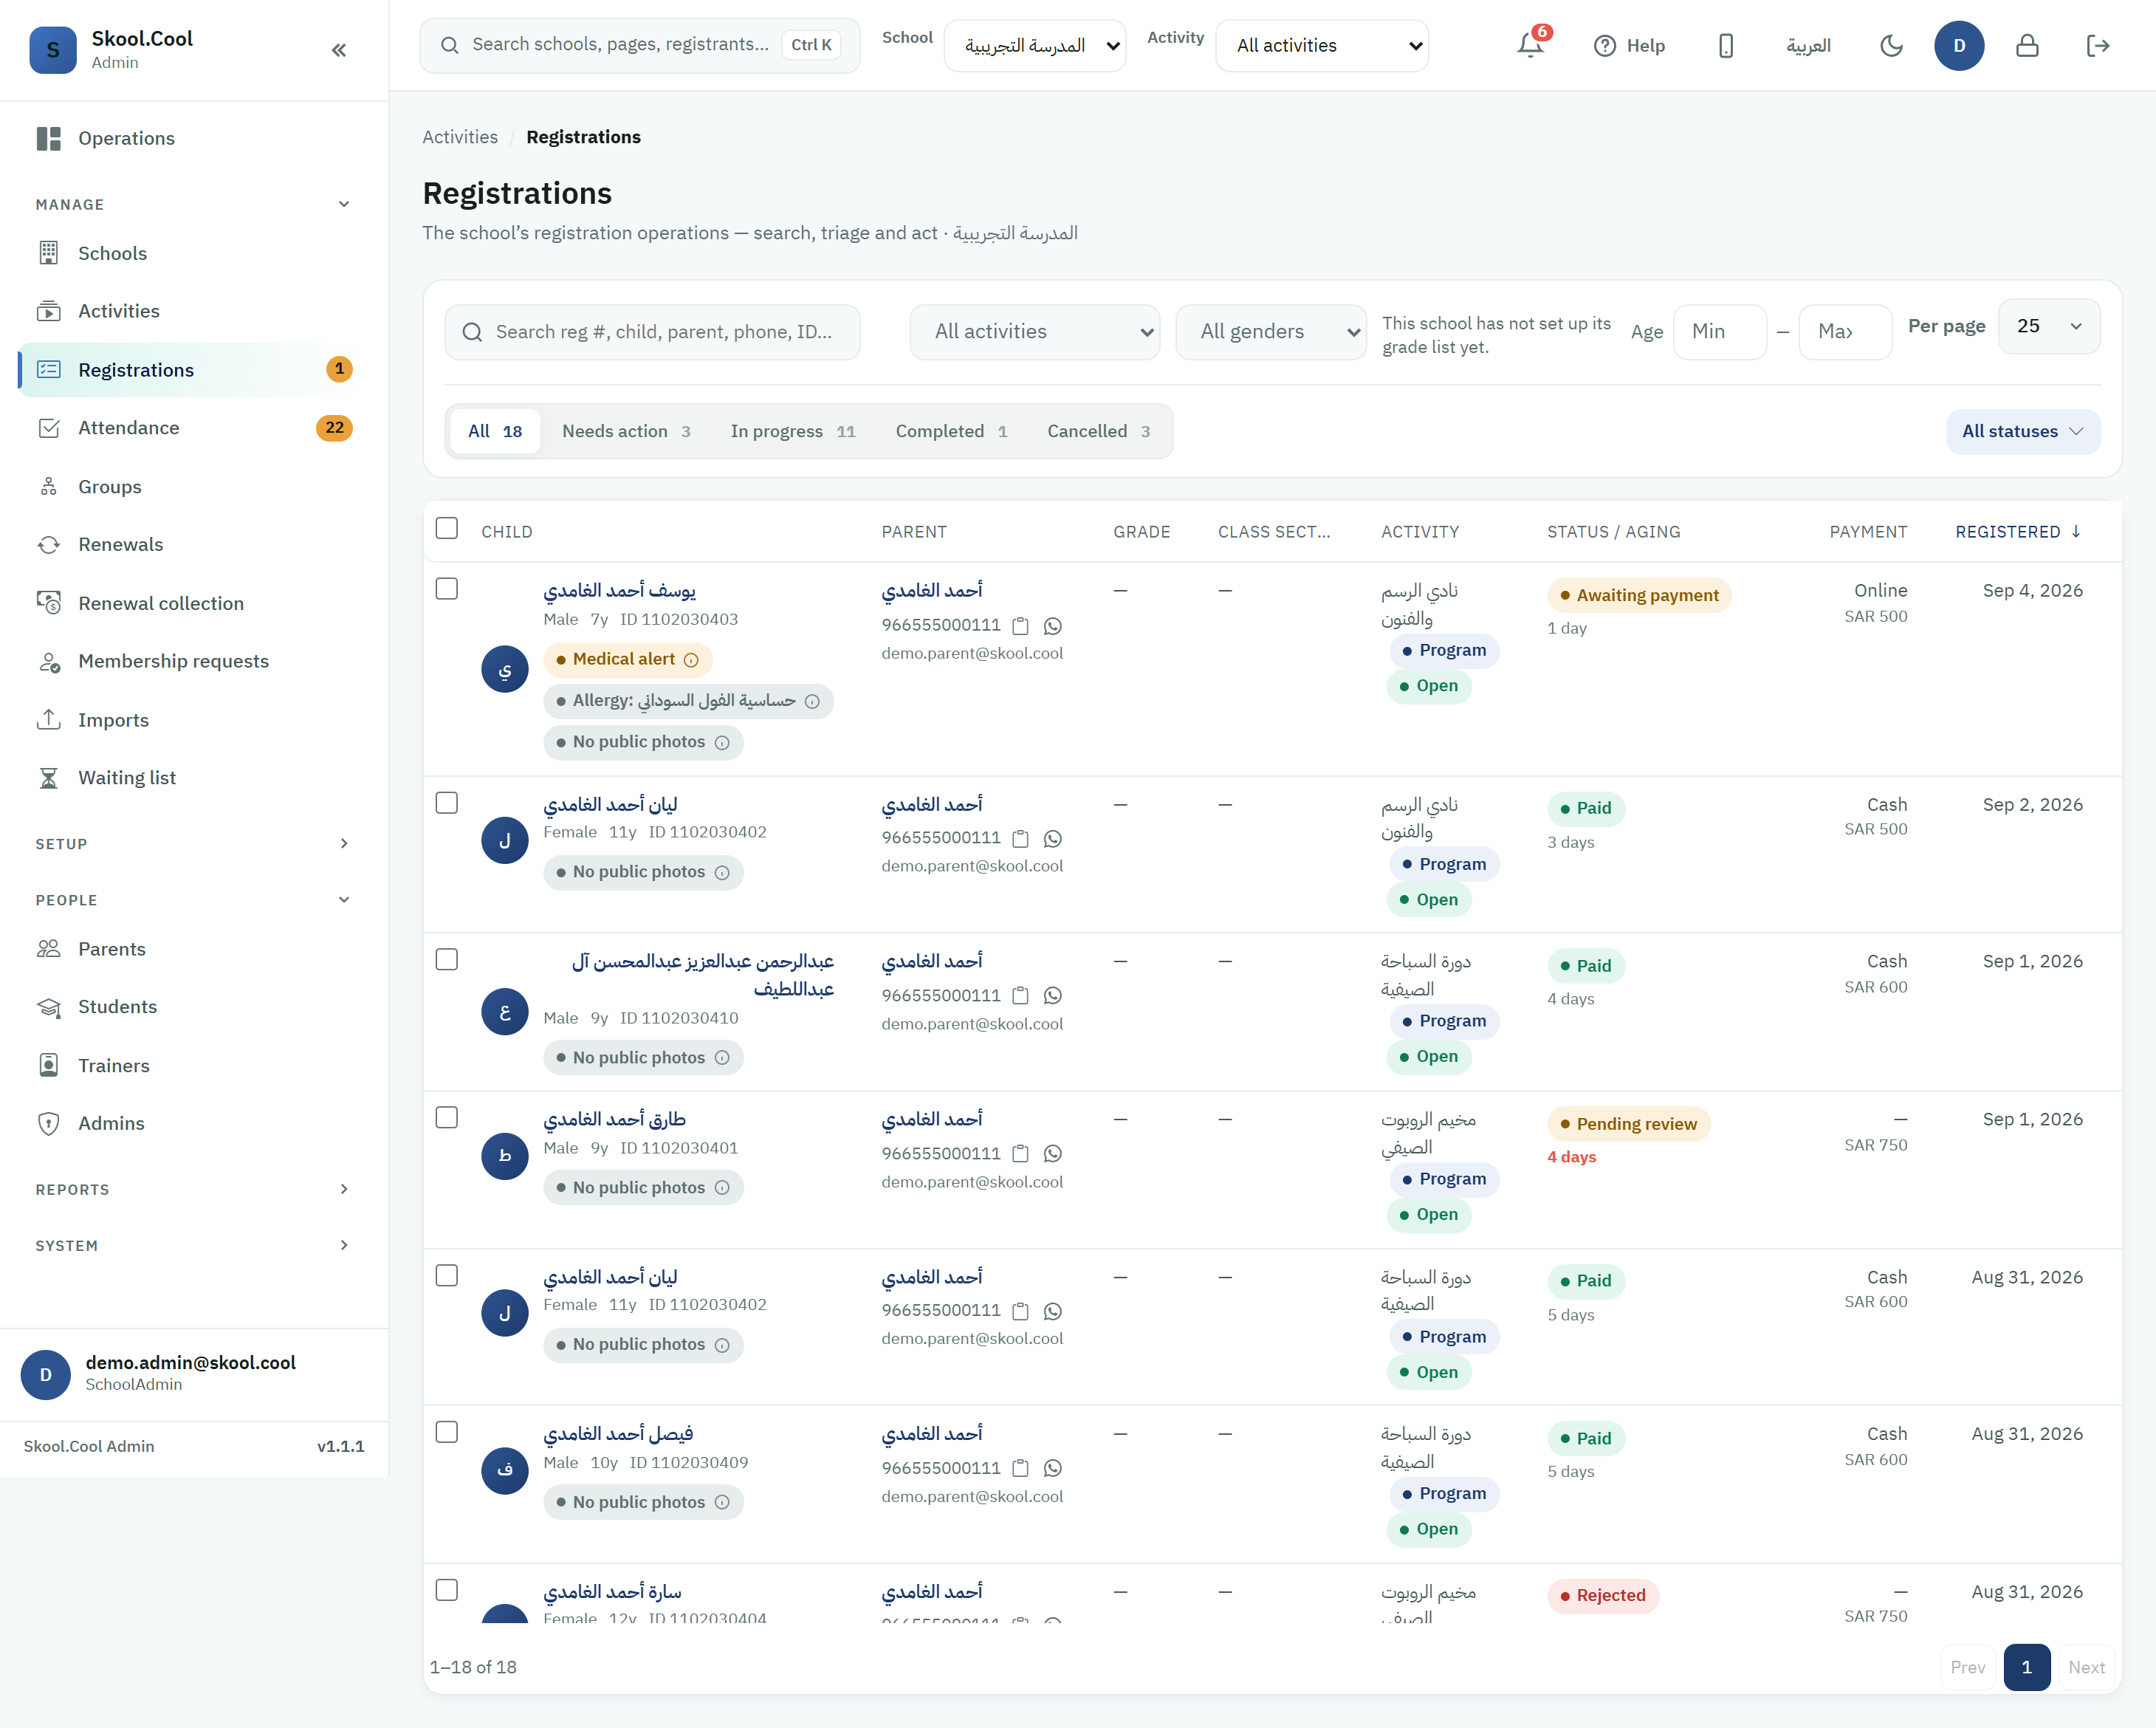
The screen is a unified, school-wide console — choosing an activity is only a filter (it does not change the page or the actions available). Every search and filter tool sits in one filter bar above the table, so it reads as a clear, self-contained control area. The available filters:
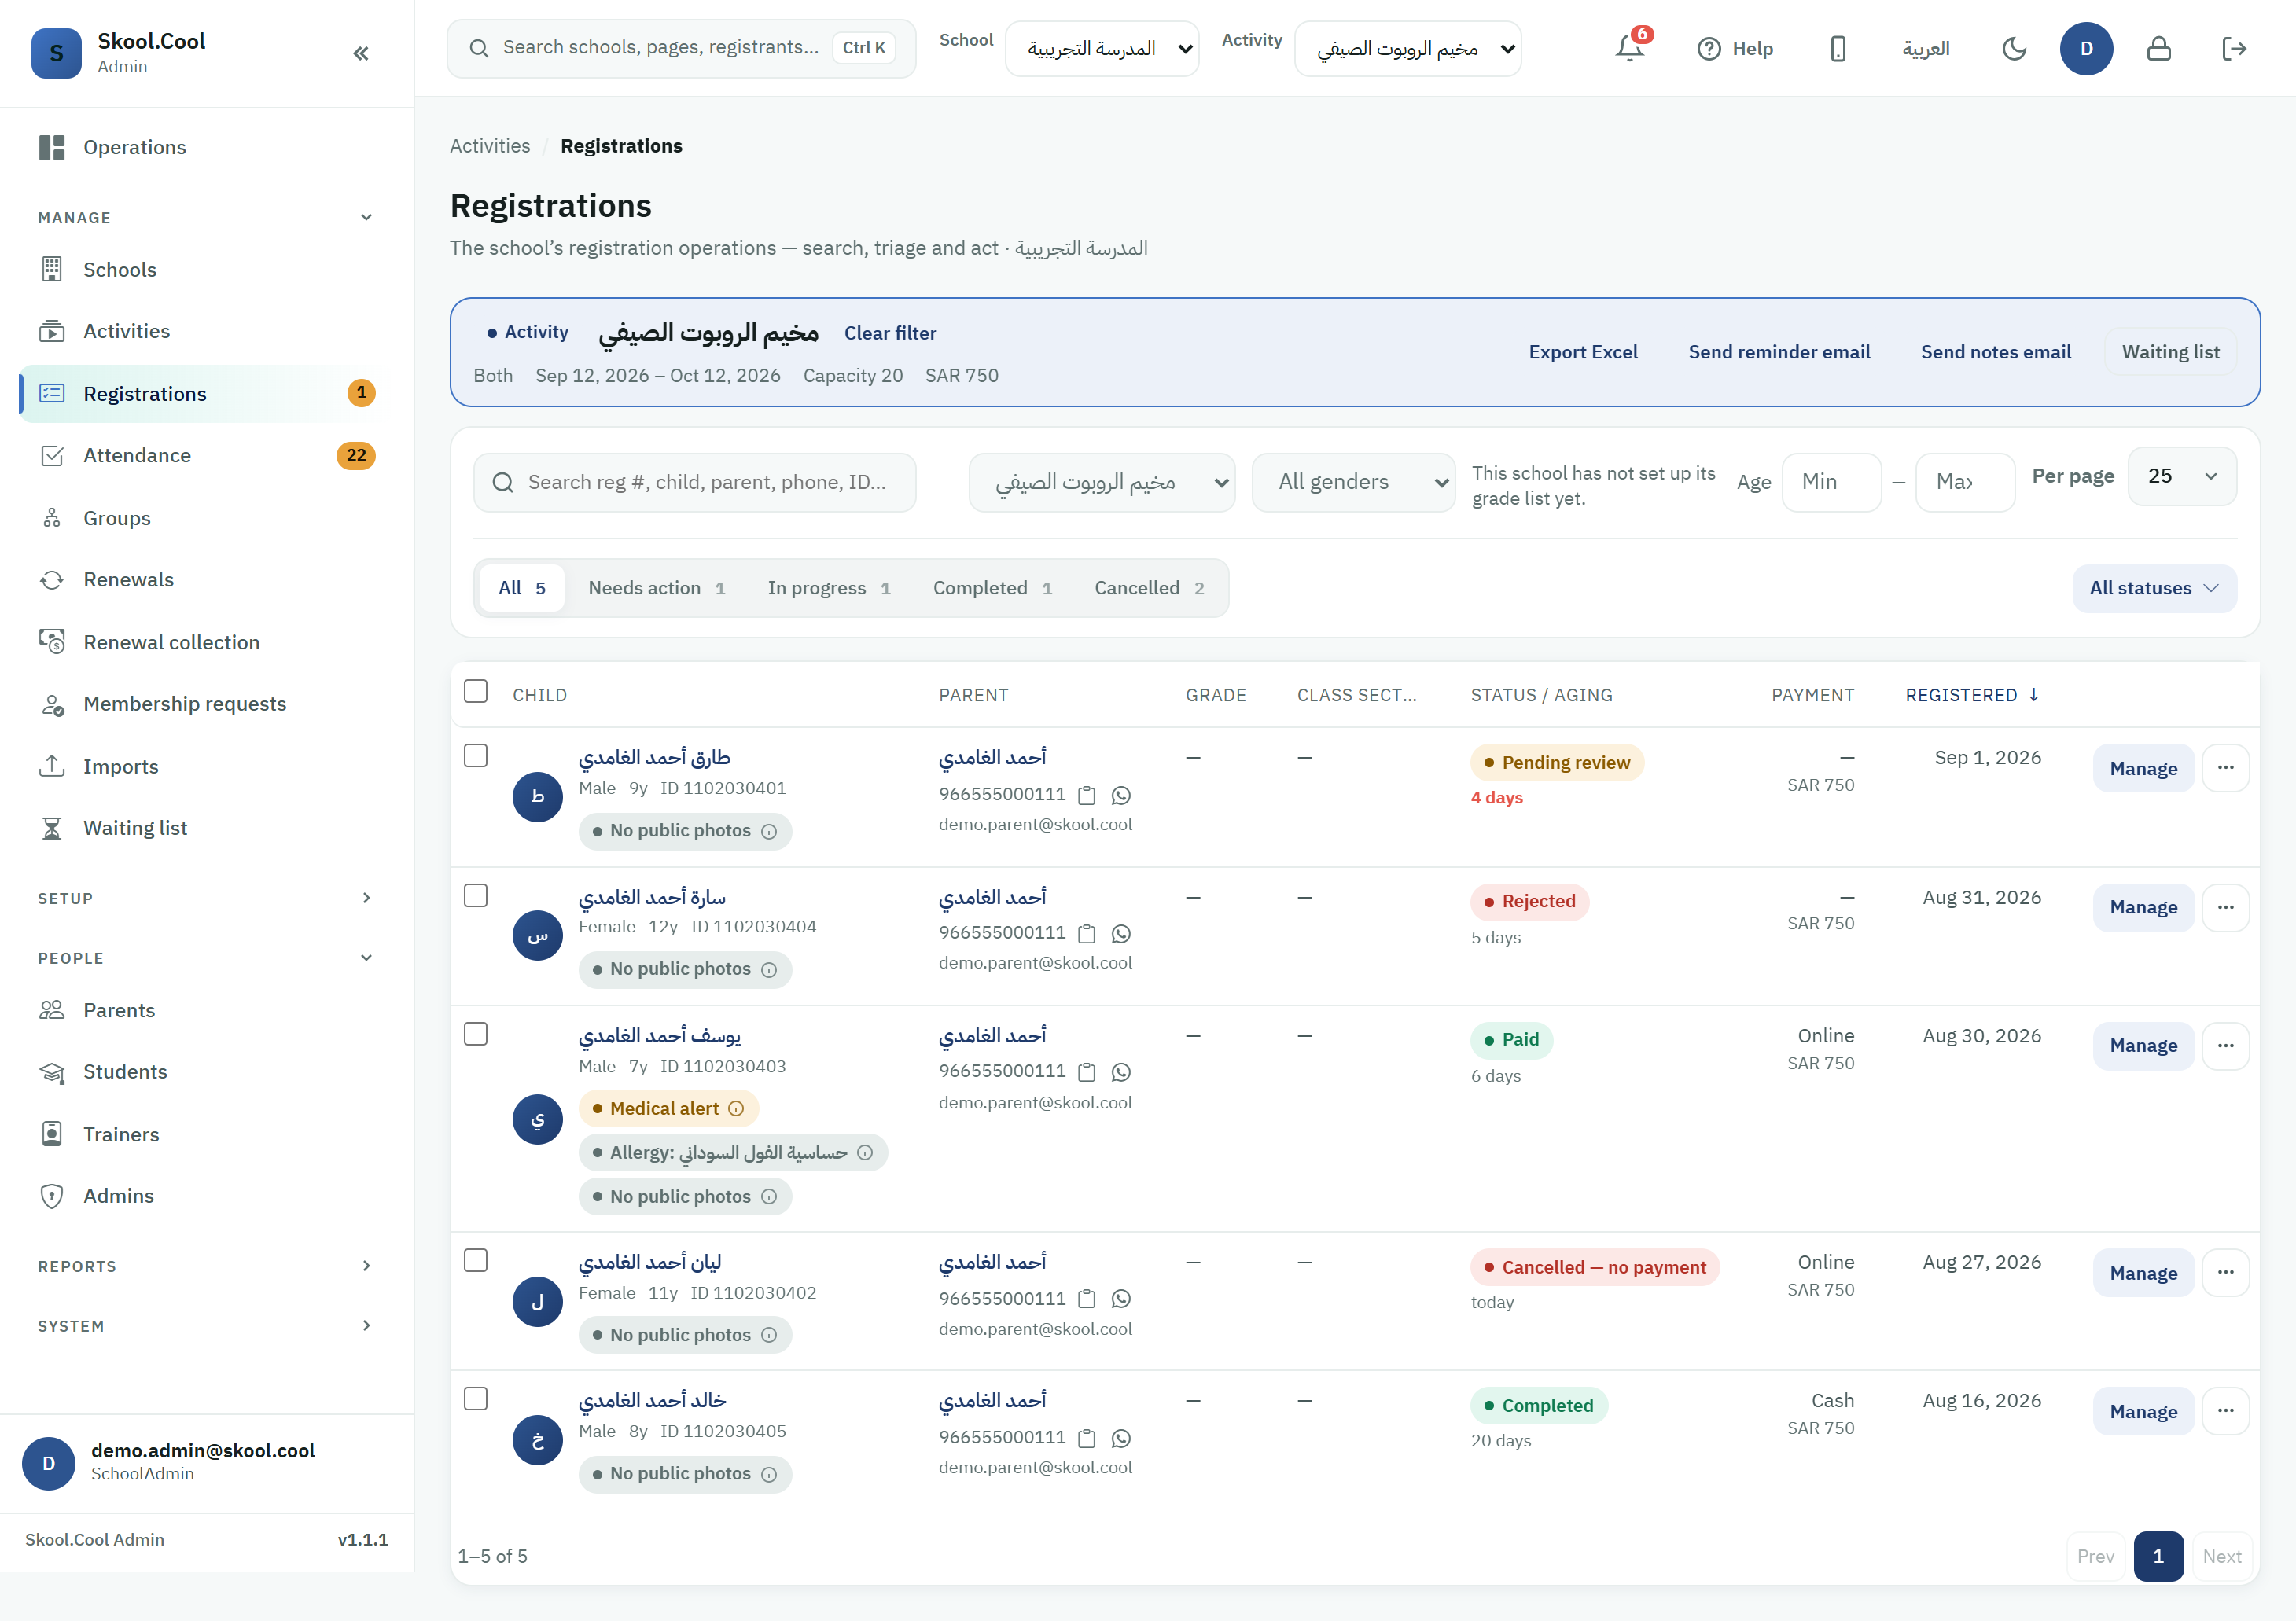
- Activity — the All activities list: every activity, or one in particular. Choosing an activity shows an activity header above the table (its name, gender, ages, dates, capacity and fees) with the activity's actions (Export Excel, Send reminder email, Send notes email, Waiting list) and a Clear filter button to go back; the activity column is hidden from the table because it would be repeated.
- Activity scope: Current · Ended · All. By default, ended and archived ones are hidden. (This section disappears when a specific activity is chosen, because it is meaningless then.)
- Gender: All genders · Male · Female.
- Age: an age range (from – to).
- Grade — the All grades list: shows the registrations of a single school grade. This list appears only at schools that use student school data (grade and class section) and only for those with permission to see it; and if the school has not set up its grade list yet, a notice appears in its place rather than an empty list. The status counters update with this filter like any other, so the numbers above the table always describe the list beneath them.
- Row count — Per page: 25 / 50 / 100.
- Search: by registration number, child's name, parent's name, mobile number or national ID (searched on the server).
Every filter (activity, status, search, gender, age, sorting) is reflected in the page's URL — copy the link and share or save it, and it will open on exactly the same view, even after a reload.
Triage groups — the primary status filter
Instead of a long row of every status, the filter bar shows four triage groups as a primary control next to All, each showing its total registrations, so you can triage in one click according to what you want to do:
- All: every registration within the active filters.
- Needs action: the requests waiting for your decision — pending review, awaiting payment, and awaiting renewal confirmation (renewal invitations).
- In progress: active registrations that are paid or awaiting payment confirmation.
- Completed: those that ended definitively without cancellation — completed, transferred to another activity, or a recorded absence.
- Cancelled: those that did not complete — rejected, cancelled (of any kind), or refunded.
Each group's number is the sum of the status counters beneath it. All the groups stay visible and clickable at all times, and clicking one with no results shows a clear "no results" state (the group does not disappear).
All statuses — precise triage: if you want to filter by one particular status, open the All statuses… list, which shows all thirteen statuses with a counter for each, so you can pick the one you want directly. Choosing a specific status clears the triage group — and the reverse — because they are alternatives, not companions.
The numbers on the tabs are live and always match the active filters — if you pick a particular activity, or search, or filter by gender or age, the numbers update to reflect that same filtering.
Viewing a specific activity
Choosing an activity from the filter list focuses the screen on it: an activity header appears above the table (name, gender, ages, dates, capacity, fees) with the activity's actions (Export Excel, the reminder and notes emails, and the waiting list), the activity column is hidden from the table, and the status counters update to reflect that activity alone.
The table's columns (sortable)
Child · Parent · Grade · Class section · Activity · Status / aging · Payment · Registered. Click any column header to sort by it.
The Grade and Class section columns appear at schools that use student school data and only for those with permission to see it, and they come from the school's own record of its student for the current school year — sparing a reviewer from opening every student's profile to match them against the school's lists. A student with no record for this year shows "—", which is a sign of something to complete rather than an error. Grade sorts by the school's own grade order rather than alphabetically, and students with no record come last in ascending order, as a deferred task.
Actions
On each row
- Manage: the main button — opens a side drawer with all the registration's details and actions.
- The ⋯ More actions menu: next to Manage, containing:
- Attendance: go to taking the student's attendance.
- Add to waiting list: move the student to the waiting list.
Bulk actions
Select several rows then carry out: Approve · Confirm payment · Reject · Export CSV · Add to group. The actions are status-aware: if the selection is mixed, you are told how many are eligible and how many are skipped, and the server checks again before carrying it out.
Add to group and schedule conflicts: this screen takes no override reason, so rows whose placement would need one because of a schedule conflict are not placed, and a notice lists them: "Children who need an override reason because of a schedule conflict: {n}. Finish placing them in Manage groups." The notice names up to 8 children, then adds "and {n} more", and carries a Manage groups button that opens the activity's group placement screen; the button shows only to staff who can open that screen. Rows whose parents had already acknowledged this exact conflict at registration, as a full-conflict acknowledgement, are placed directly and counted in the result: "placed without an override reason because the parents acknowledged this exact conflict at registration: {n}". Details in Student schedule conflicts.
Confirming payment sends real notifications and emails to parents — a confirmation step and a warning appear before it runs.
Exporting to a file
There are two exports on this screen, each with its own place and scope:
| Export Excel | Export CSV | |
|---|---|---|
| Where | Within the activity's actions, after choosing a specific activity from the filters | On the bulk actions bar, after selecting rows |
| What it covers | Every registration on the activity | Only the rows you selected |
Both files carry Grade and Class section alongside the student's and their guardian's details and the registration status — under the same condition that shows those columns in the table: that the school uses student school data, and that you have permission to see it at that school. At schools that do not use it, the two columns are absent from the file entirely — not blank — so an empty cell is never read as "this student has no grade".
To distribute registrants across classes: filter the screen to the activity you want, then use Export Excel for the complete list with grades and class sections in one file. To export only a chosen subset (just those awaiting payment, say), select their rows and use Export CSV.
Both files write the grade's name in the language of the interface you are working in: in an Arabic session «الرابع الابتدائي», in English Primary 4 — as the school names it in its grade list. And if the school has not written an English name for a grade, its Arabic name appears rather than a blank cell. The class section is the school's own text, and it does not change with the language.
Safety indicators (text badges)
Beneath a child's name on each row, safety text badges may appear, helping admins take the right precautions without opening the side drawer:
- Life-threatening: a red badge — the highest priority, calling for urgent attention.
- Medical alert: an amber badge — the child has a recorded health condition.
- Allergy: …: a short summary of the recorded allergy.
- No public photos: the guardian has not given consent for public or marketing photography.
The health badges appear only to users with permission to see students' health information. The absence of a badge means "not recorded yet, or not shown to you" — not "there is no condition".
The same badges also appear on the session attendance page next to students' names.
The student detail drawer
Pressing Manage (or the student's name) slides open a side drawer showing the child's details (name, gender, age, ID), the guardian's details (mobile, email), the registration's status and date, and the action buttons — without leaving the table. Press Close (the X) or click outside the drawer to close it.
The health and safety section in the drawer
For those with permission to see health information, the drawer shows an extra health and safety section containing:
- Whether a health condition exists, and a life-threatening indicator if there is one.
- The details: allergies, chronic conditions, regular medication, special needs, and emergency instructions.
- The state of photography consent at both its levels (internal and public).
This section loads independently; if you do not have the permission, or the guardian has not entered their health details, it stays hidden without affecting the rest of the drawer.
Frequently asked questions
How do I approve or reject a registration request? From the table, press Manage on the row to open the side drawer, or select several rows and use the bulk Approve / Reject actions. Details: Approving a request and Rejecting with a reason.
How do I filter for students who have not paid? Choose the Needs action triage group (which includes awaiting payment), or open All statuses and pick the awaiting-payment status directly.
How do I find a particular student or parent? Use the search field in the filter bar — the server searches by registration number, child's name, parent's name, mobile number or national ID.
I ran an action on rows with mixed statuses — what happens? The bulk actions are status-aware: the system tells you how many rows are eligible and how many are skipped, and the server checks again before carrying it out.