Group placement
Goal
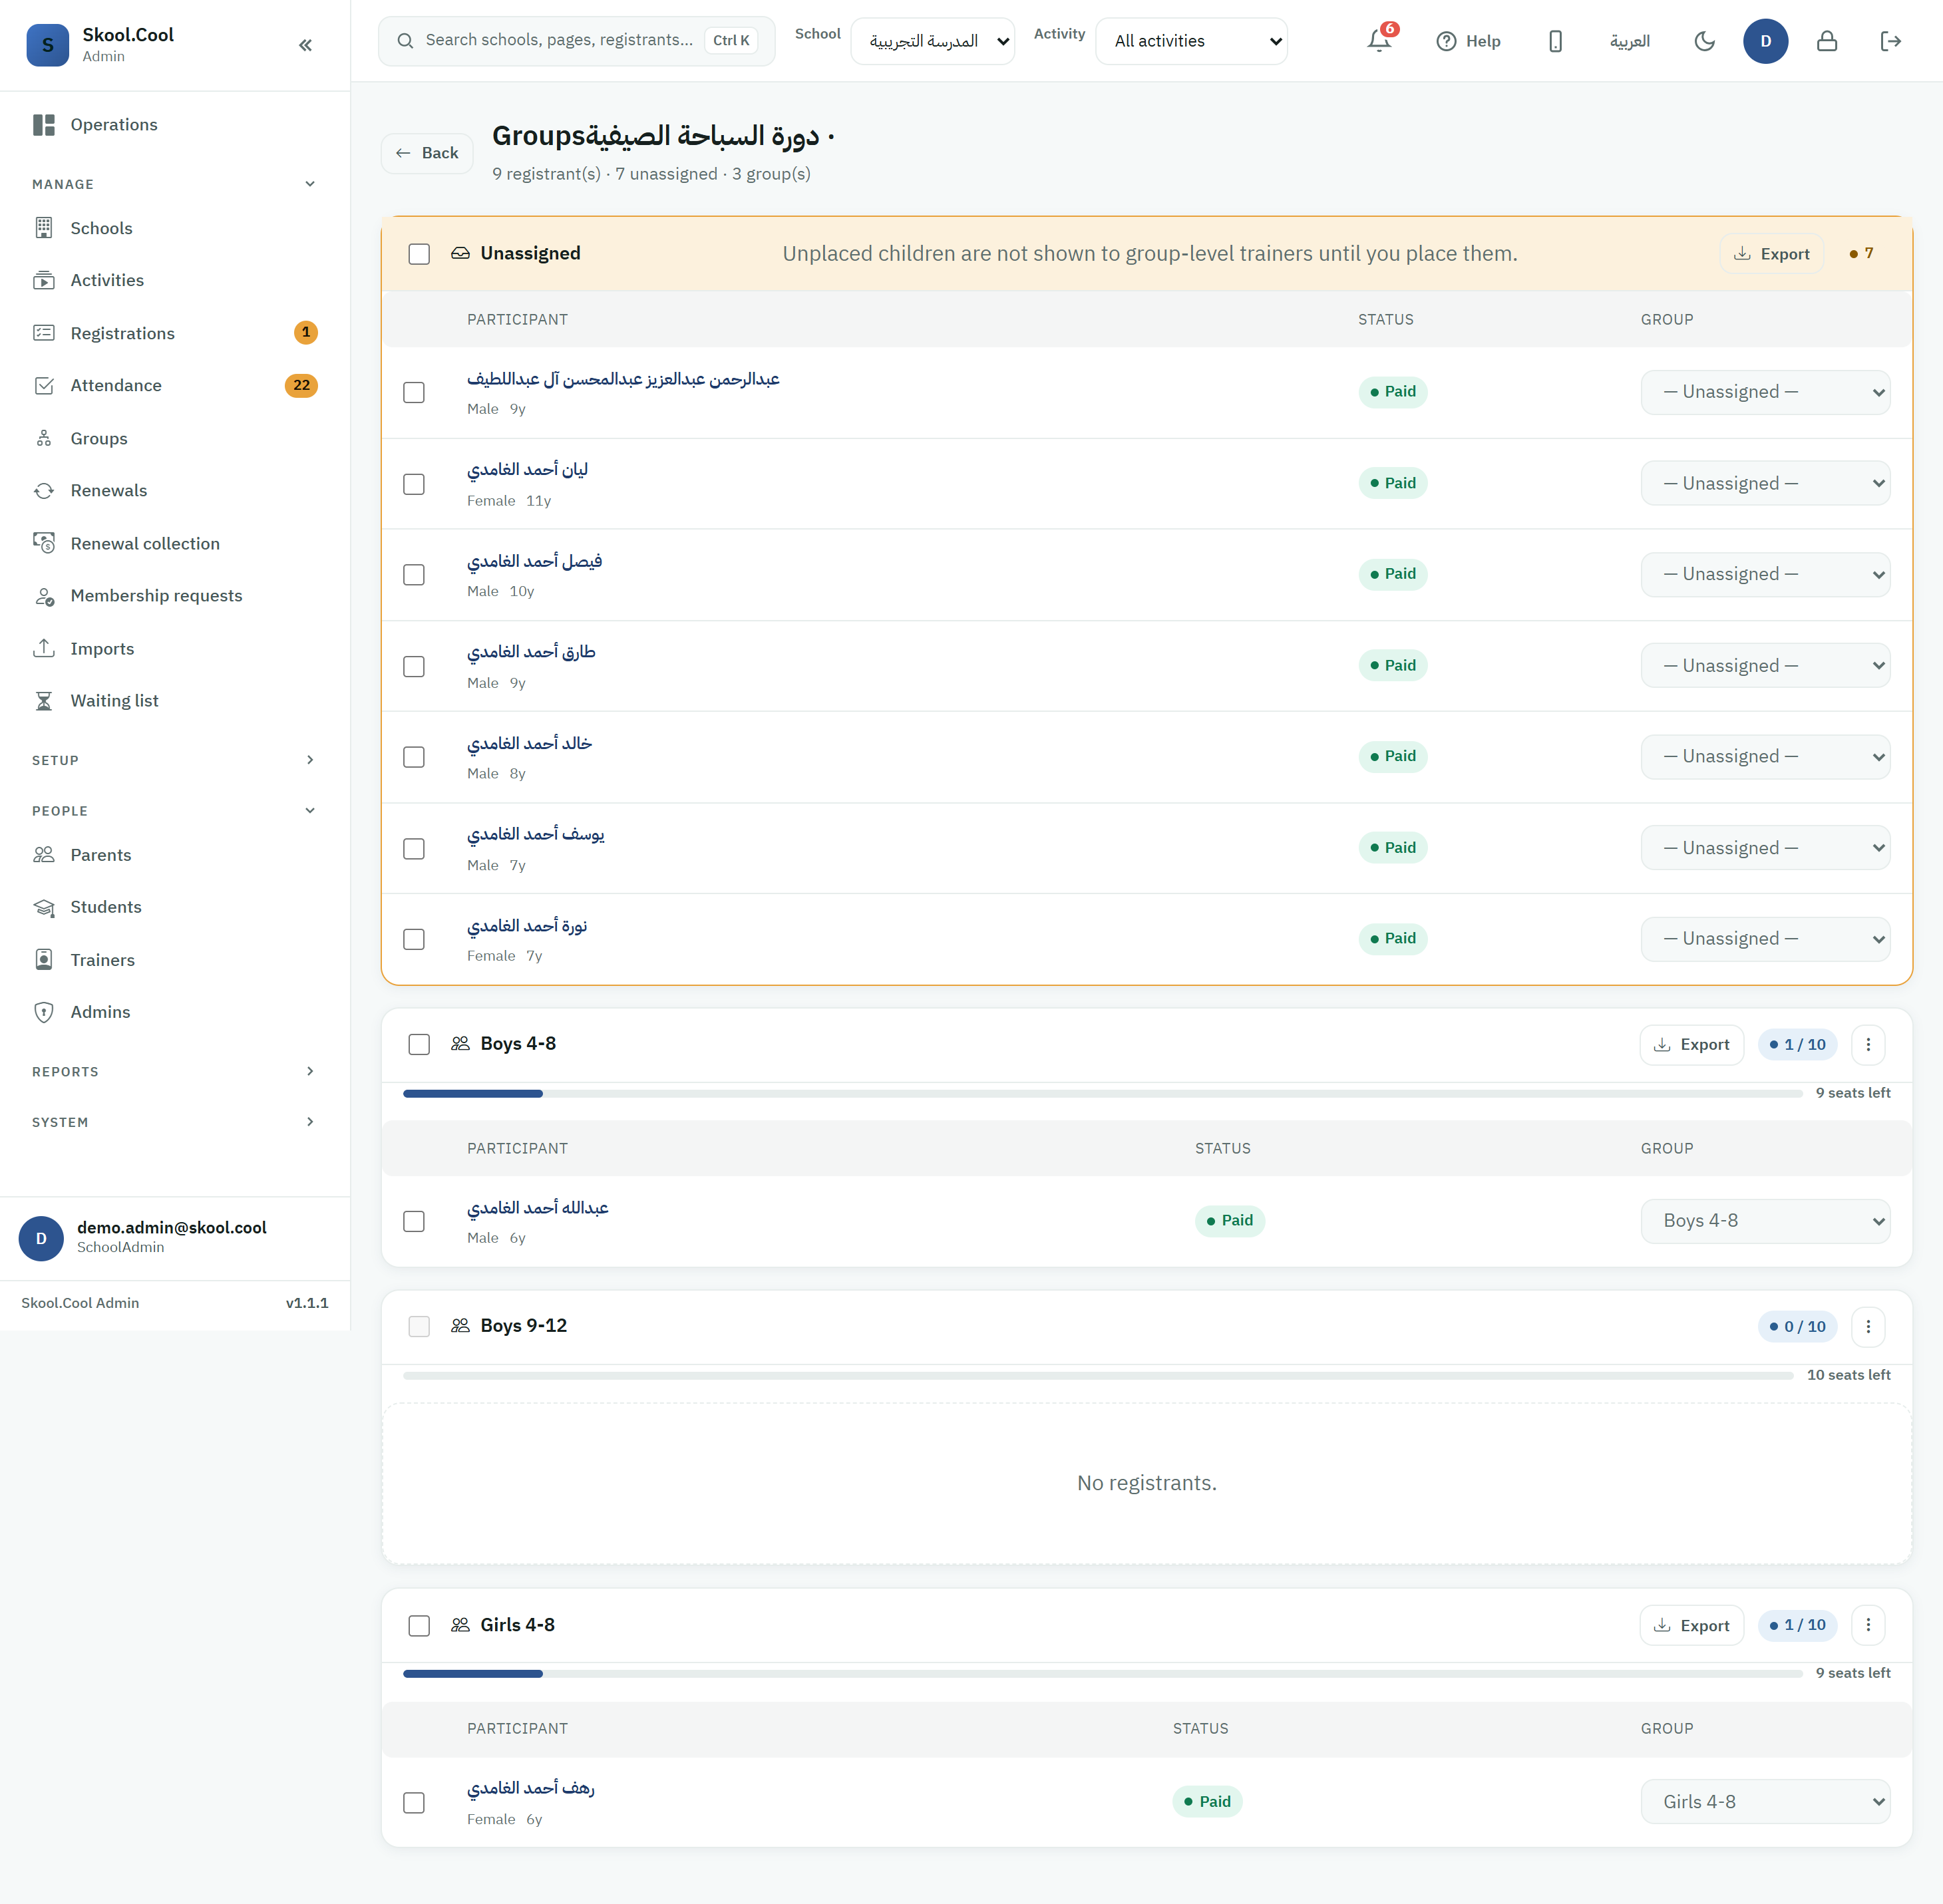
Once parents have registered their children on the main activity and payment is complete, the school places each student into the group that suits them within the activity (a girls' group, and boys' groups by age range, for example). This screen shows each student's age and gender, how well they fit each group, and each group's capacity and remaining seats — so placement is quick and mistakes are few, from a computer or a phone.
This screen is for activities that have been divided into groups. To create the groups first, see Groups and extended activities.
When do you need this screen?
Once registrations for an activity divided into groups are complete, when you want to put each student into the group that suits them (by age, gender and capacity) before the sessions start, or to move a student from one group to another later.
Before you start
- You need permission to place students into groups (usually granted to the school coordinator and the management roles). Without it you see the list for reference only, with no placement buttons.
- The activity must already be divided into groups — see Groups and extended activities.
- This screen lists only the registrations in which the student is genuinely enrolled: Paid, User paid, and Awaiting renewal — a renewal invitation whose fees are not yet paid, but whose holder is a returning student keeping their seat (see Reference: payment states). Every one of them can be placed unless it is on the waiting list. A registration that is Pending review or Awaiting payment does not appear here at all: you will find it on the Registrations screen, and it appears here, ready to place, as soon as its payment is confirmed.
- For the fit badges (age and gender) to appear, the student's date of birth and gender must be recorded on their profile.
Where it lives
There are two ways in:
- From the Activities hub: open the main activity that is divided into groups, then choose Manage groups.
- From the Groups page in the sidebar: it opens the school groups overview — every program with its groups and placement status — and then you press Manage placement on the program you want. It works as soon as a school is selected, with no activity chosen in the filter.
The screen appears titled Groups followed by the activity's name, with a summary at the top of the page showing how many registrations this screen lists, how many are unplaced, and how many groups there are. Because the screen does not list registrations that are Pending review, Awaiting payment or cancelled, this number can be lower than what you see for the same activity on the Registrations screen.
The Activity filter in the top bar (on a computer) works alongside the school switcher: choosing an activity narrows the Registrations and Attendance screens to that activity alone. It resets when you switch school. To clear it, choose All activities. This filter does not affect the sidebar Groups item, which works across the whole school.
Reading the screen
Names are arranged in boxes: an Unassigned box at the top, then a separate card for each group.
1) Age and gender on every row
Each row shows the student's name along with their gender and age (for example, Male 7y). Those two pieces of information are the basis for choosing the right group.
2) Fit badges
A small badge shows how well the group suits the student:
| Badge | What it means |
|---|---|
| Fits | A match: the student's gender and age range are within the group's rules. |
| Too young / Too old | The age is below or above the group's age range (with the age against the range shown alongside, for example age 7 · 4-8). |
| Other gender | The student's gender differs from the group's (a boy against a girls' group, say). It never shows on a mixed group (one open to both boys and girls), because a mixed group suits any student. |
| Full | The group is complete (its membership has reached its capacity). |
These badges are guidance only; a mismatch in age or gender appears as a warning, not a block. The final decision always rests with the school coordinator, who can place the student despite the warning after writing a reason (see "Placing despite a mismatch" below). For these badges to appear, the student's date of birth and gender must be recorded on their profile.
In the Unassigned box, the fit badges appear on every row (as in the table above: fits / too young / too old / other gender / full) to guide the choice. The system does not offer a ready-made "suggested" group next to the name — the final decision is always the coordinator's, based on these badges and on each group's capacity.
The Conflict acknowledged chip
A student's row may show a Conflict acknowledged chip under their name, with the date of the acknowledgement beside it. It means the parent acknowledged a schedule conflict when registering this student. The chip describes what happened at registration and nothing more: it does not promise that placing the student into a particular group will skip the conflict dialog. That is decided at the placement itself (see "Schedule conflict" below).
3) Capacity and seats left
Each group shows a badge of its current count against its capacity (for example, 1 / 10), a fill bar, and the number of seats left (for example, 9 seats left). The bar turns to the warning colour once capacity is reached or exceeded.
The Export button at the top of each group exports its members to a CSV file, which includes the guardian's name, and the grade and class section at schools that use student school data.
The placement roster's columns
For each student the roster shows: Participant · Grade · Class section · Status · Group. The grade and class-section columns appear at schools that use student school data, and only for those with permission to see it, because placement is usually done on the basis of grade and class. On a phone screen they appear on a small line beneath the student's name rather than as columns.
The guardian's name is no longer a separate column on the placement roster, because placement is done on the basis of the student's details rather than their guardian's. The name has not been removed from the system: it is still in the export file, in the student's profile that opens when you click their name, and it appears in the Participant field on registrations a guardian made for themselves.
4) The group actions menu (⋮)
Each group card carries a ⋮ menu labelled group actions, offering — according to your permissions:
- Edit group — opens the page for editing the group's details (name, capacity, age range, schedule, and so on).
- Close group — begins closing the group. If the group contains students, the system blocks the closure and explains the impact first — so a full group is never closed before its members are dealt with.
Placing from a phone
The screen is designed for one-handed use on a phone:
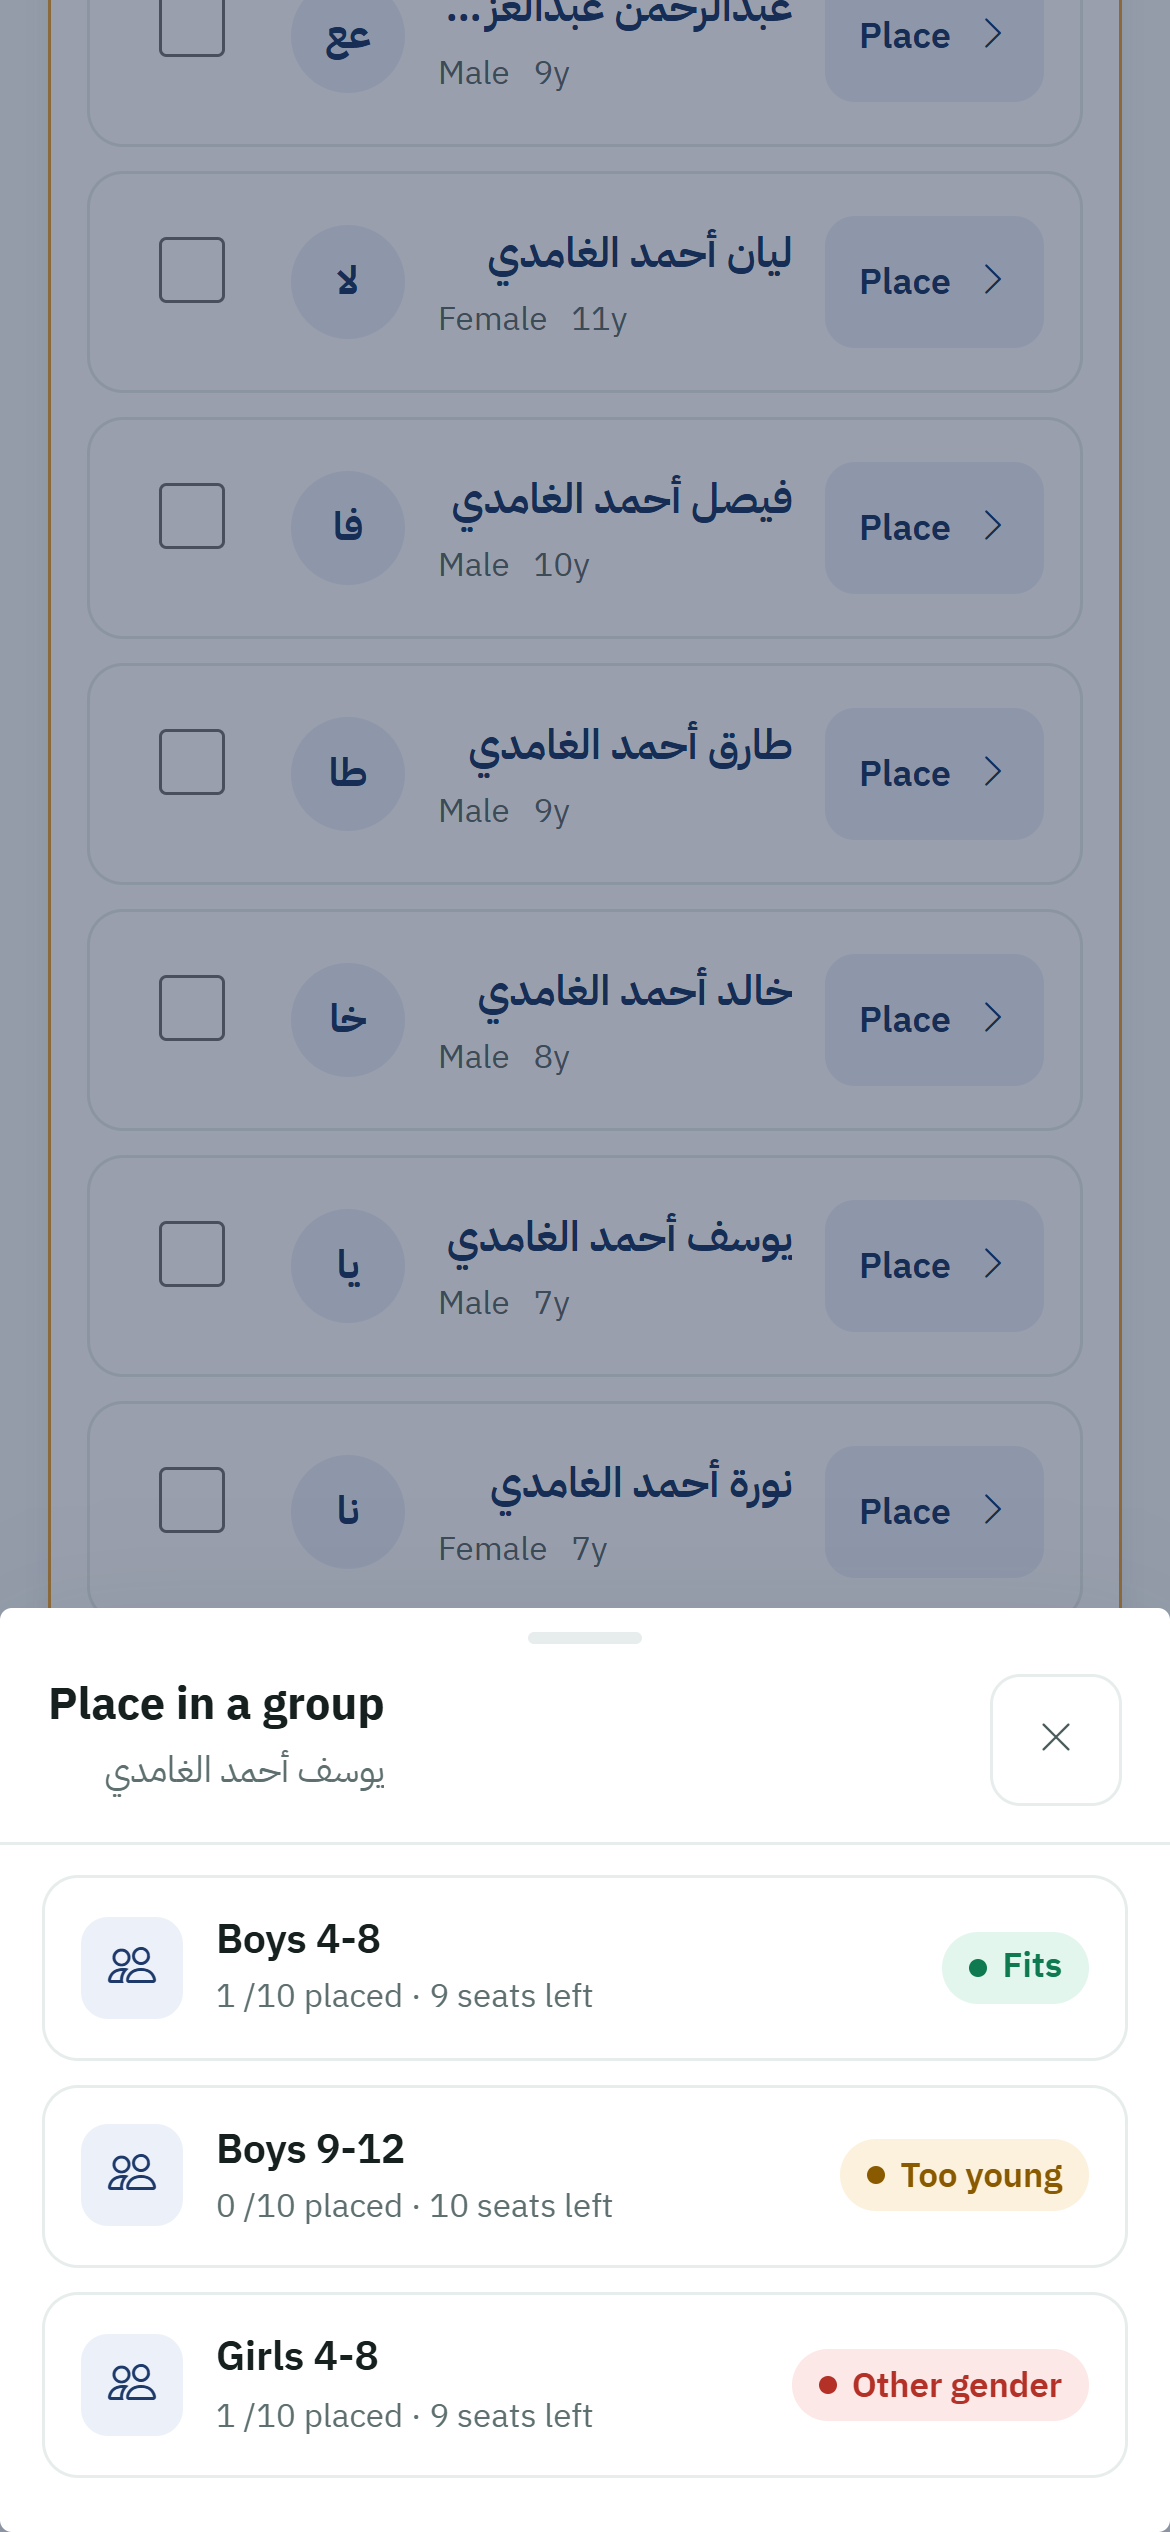
- Next to the student's name press Place — or Move if they are already placed. A student whose registration is still on the waiting list has no button beside them; the reason is written under their name instead: On waiting list.
- A bottom sheet titled Place in a group opens listing every group, each with its fit badge for this student and the seats left in it.
- Tap the right group and the placement happens immediately.
Because the sheet shows how each group fits the selected student, the right choice is clear at a glance, with no need to remember every group's rules.
Filling a group in one go — from a phone
Alongside placing one student at a time, the phone screen offers a faster way round: you pick the target group first, then add students to it with one tap each. This suits filling a particular group (say "Boys 4-8") from the unassigned list in one go. It is available on phones only (it disappears on a computer, where the per-row dropdown is used instead).
- At the top of the screen there is a row of group badges, each carrying the group's name and its current count against its capacity (for example,
3/10), under the heading Fill a group. - Tap the badge of the group you want to fill to activate it as the target. Before you choose, a hint reads: pick a group, then tap students to add them. Tap the same badge again to deactivate it.
- Once activated, an Add button appears next to each student, adding them straight into the active group. The fit badge on each card is now calculated against the active group, to guide your next tap.
- A student already in the active group shows In group instead of the add button, and a student whose registration is still on the waiting list has no add button; the reason is written under their name (On waiting list), and they cannot be added until you accept them from the waiting list.
- A fixed bar stays at the bottom of the screen showing the active group and its live count plus how many you have added in this session (N added), with Undo to reverse the last addition and Done to leave filling mode.
Quick filling works within exactly the same controls: adding a student who does not match the active group (by age or gender) opens the Check the group fit dialog, which asks for a reason and then Place anyway, and the schedule conflict warning applies too — just as in ordinary placement (see "Placing despite a mismatch" below). It shortens the steps without dropping a single control.
The same tool is available with the same buttons in the staff field-work phone interface: Fill a group, Add, Undo and Done, with the N added counter.
Placing from a computer
On a computer, each row has a Group dropdown; choose a group from it to place the student directly, or choose — Unassigned — to return them to the unplaced box.
Bulk placement
To place several students at once:
- Tick the boxes next to the students you want (or use the box at the top of the container to select them all).
- A bottom bar appears showing how many are selected (N selected).
- Choose the target group: Assign to group on a phone, or Assign selected to… and then Assign on a computer.
- While the assignment runs, the selection and the screen's other placement controls are locked until the answer arrives, in the field-work interface too. If you move to another page meanwhile, the move waits for the answer: it goes ahead once the students are placed, and is cancelled if the assignment is refused or a reason is asked for some of them, so you stay on the page to see the message or the dialog.
Registrations still on the waiting list cannot be selected; the checkbox next to them is disabled, and they cannot be placed until you accept them from the waiting list. Registrations whose payment is incomplete do not appear on this screen at all (see "Before you start").
Placing despite a mismatch (an override)
When you place a student into a group they do not match (by age or gender), the Check the group fit dialog appears summarising why they do not match and asking for a reason in a required field (Reason for placing anyway), and the placement then completes when you press Place anyway. The reason is saved with the placement for later reference.
If the group's times clash with another of the student's activities, a separate Schedule conflict warning appears, handled the same way (an override reason that is recorded, and the guardian is notified): the reason field's placeholder reads "Why are you placing despite the conflict?", and Assign anyway completes the placement. The dialog names each student, and under the name it may say that the parent acknowledged this exact conflict at registration, or that the parent acknowledged a conflict, but that acknowledgment does not cover this placement (as with any partial-conflict acknowledgement). In a bulk placement, one dialog lists every student who needs a reason.
The dialog does not appear at all when the parent acknowledged a full conflict at registration and every overlap this placement creates is one they already acknowledged (the same other activity, the same dates and times): the student is placed directly, with no reason, and a message reads "{name} was placed without an override reason: the parent acknowledged this exact conflict at registration". A partial-conflict acknowledgement never waives the reason. Details in Student schedule conflicts.
Undoing the last placement
After every placement (single or bulk), a temporary notification appears with an Undo button, letting you reverse the last action within a few seconds.
If moving the students back to where they were runs into a schedule conflict, a dialog opens, and nobody is moved back until you confirm. For one student it reads "Moving this child back conflicts with the child's other activities. Nothing has been moved back yet."; for several, "Children whose move back conflicts with their other activities: {n}. Nobody has been moved back yet." Write the reason in the field (its placeholder reads "Why are you moving back despite the conflict?") and press Move back anyway. One reason moves them all back.
Moving a student, or removing them from a group
- Moving: press Move next to a placed student and choose the new group.
- Removing: from the bottom sheet on a phone choose Remove from group to return them to unplaced (or choose — Unassigned — from the dropdown on a computer).
What you should end up with
As soon as a placement completes it is saved: the student moves to their group's card, the group's counter and seats left update immediately, and the Unassigned box shrinks. You can still move, remove or undo at any time.
States you might see
- This program has no groups yet — add the groups first from activity management, then place the registrants here.
- No registrants — there are no students in this group yet.
- Awaiting renewal in the Status column (on a computer) — a renewal invitation the family has not yet confirmed and whose fees are not yet paid. You can place the student now; there is no need to wait for the payment.
- A registered student who is not in any box — their registration is Pending review, Awaiting payment or cancelled, and the placement screen does not list those. Follow it up on the Registrations screen (see the FAQ below).
- On waiting list — the registration is still on the waiting list, so it cannot be placed until you accept it from there — see Waiting list.
- A hint above the Unassigned box explaining that unplaced children are not visible to group trainers until you place them. A trainer assigned to a group sees only their own group's children; a student not yet placed stays visible to management and to the trainer assigned to the main program, and reaches the group's trainer as soon as they are placed. See What does a trainer see?.
Frequently asked questions
What do the "too young" or "other gender" badges mean? Do they stop me placing the student? They are guidance only, warning that the age or gender does not match the group's rules, and they do not block placement. If you place the student anyway, the Check the group fit dialog asks for a reason, and then Place anyway saves that reason with the action.
Why can I not find a registered student on the placement screen? Usually because their registration is not paid yet: the placement screen does not list a registration that is Pending review or Awaiting payment (or cancelled) in any box. Look the student up on the Registrations screen, where you will most often find them under the Needs action triage group. Finish reviewing it or confirm its payment — see Confirm a cash payment — and as soon as the payment is confirmed they appear here and you can place them. Watch out with renewals: an Awaiting renewal invitation is listed here and can be placed, but once the family confirms the renewal the registration moves to Awaiting payment, so it drops off the placement screen until its fees are collected — see Renewals.
Why can I not place a student who is on the list? Their button is locked. Their registration is still On waiting list. Accept it from the waiting list first, then come back and place them.
How do I fill a whole group quickly from a phone? Use the Fill a group bar at the top of the screen: tap the target group's badge to activate it, then press Add next to each student to add them directly. A bottom bar shows the live count with Undo and Done buttons.
I placed someone by mistake — how do I put them back? After every action a notification appears with an Undo button that returns the student to where they were, within a few seconds. To move them to another group press Move, and to take them out choose Remove from group (or — Unassigned — on a computer).
I got a "schedule conflict" warning while placing — what do I do? It means the group's times overlap with another of the student's activities. Review the conflict's details, and if you want to go ahead, write the override reason and complete it — details in Student schedule conflicts.