Navigating the admin portal and the school switcher
Goal
Understand the parts of the admin portal after signing in, move efficiently between sections, and use the top bar and the school switcher to change which branch you are working on.
When do you need this?
- On your first visit to the admin portal, to learn where the sections live.
- When you manage more than one branch or school and need to switch between them.
- When you are trying to work out why a particular item appears or disappears from the sidebar.
Before you start
- What you need: a signed-in admin portal account.
- Sidebar items appear according to your permissions — anything you do not have permission for simply is not shown. To learn more, see Roles and permissions.
Where it lives
This shell (the top bar plus the sidebar) appears automatically on every page once you are signed in.
The main parts of the interface
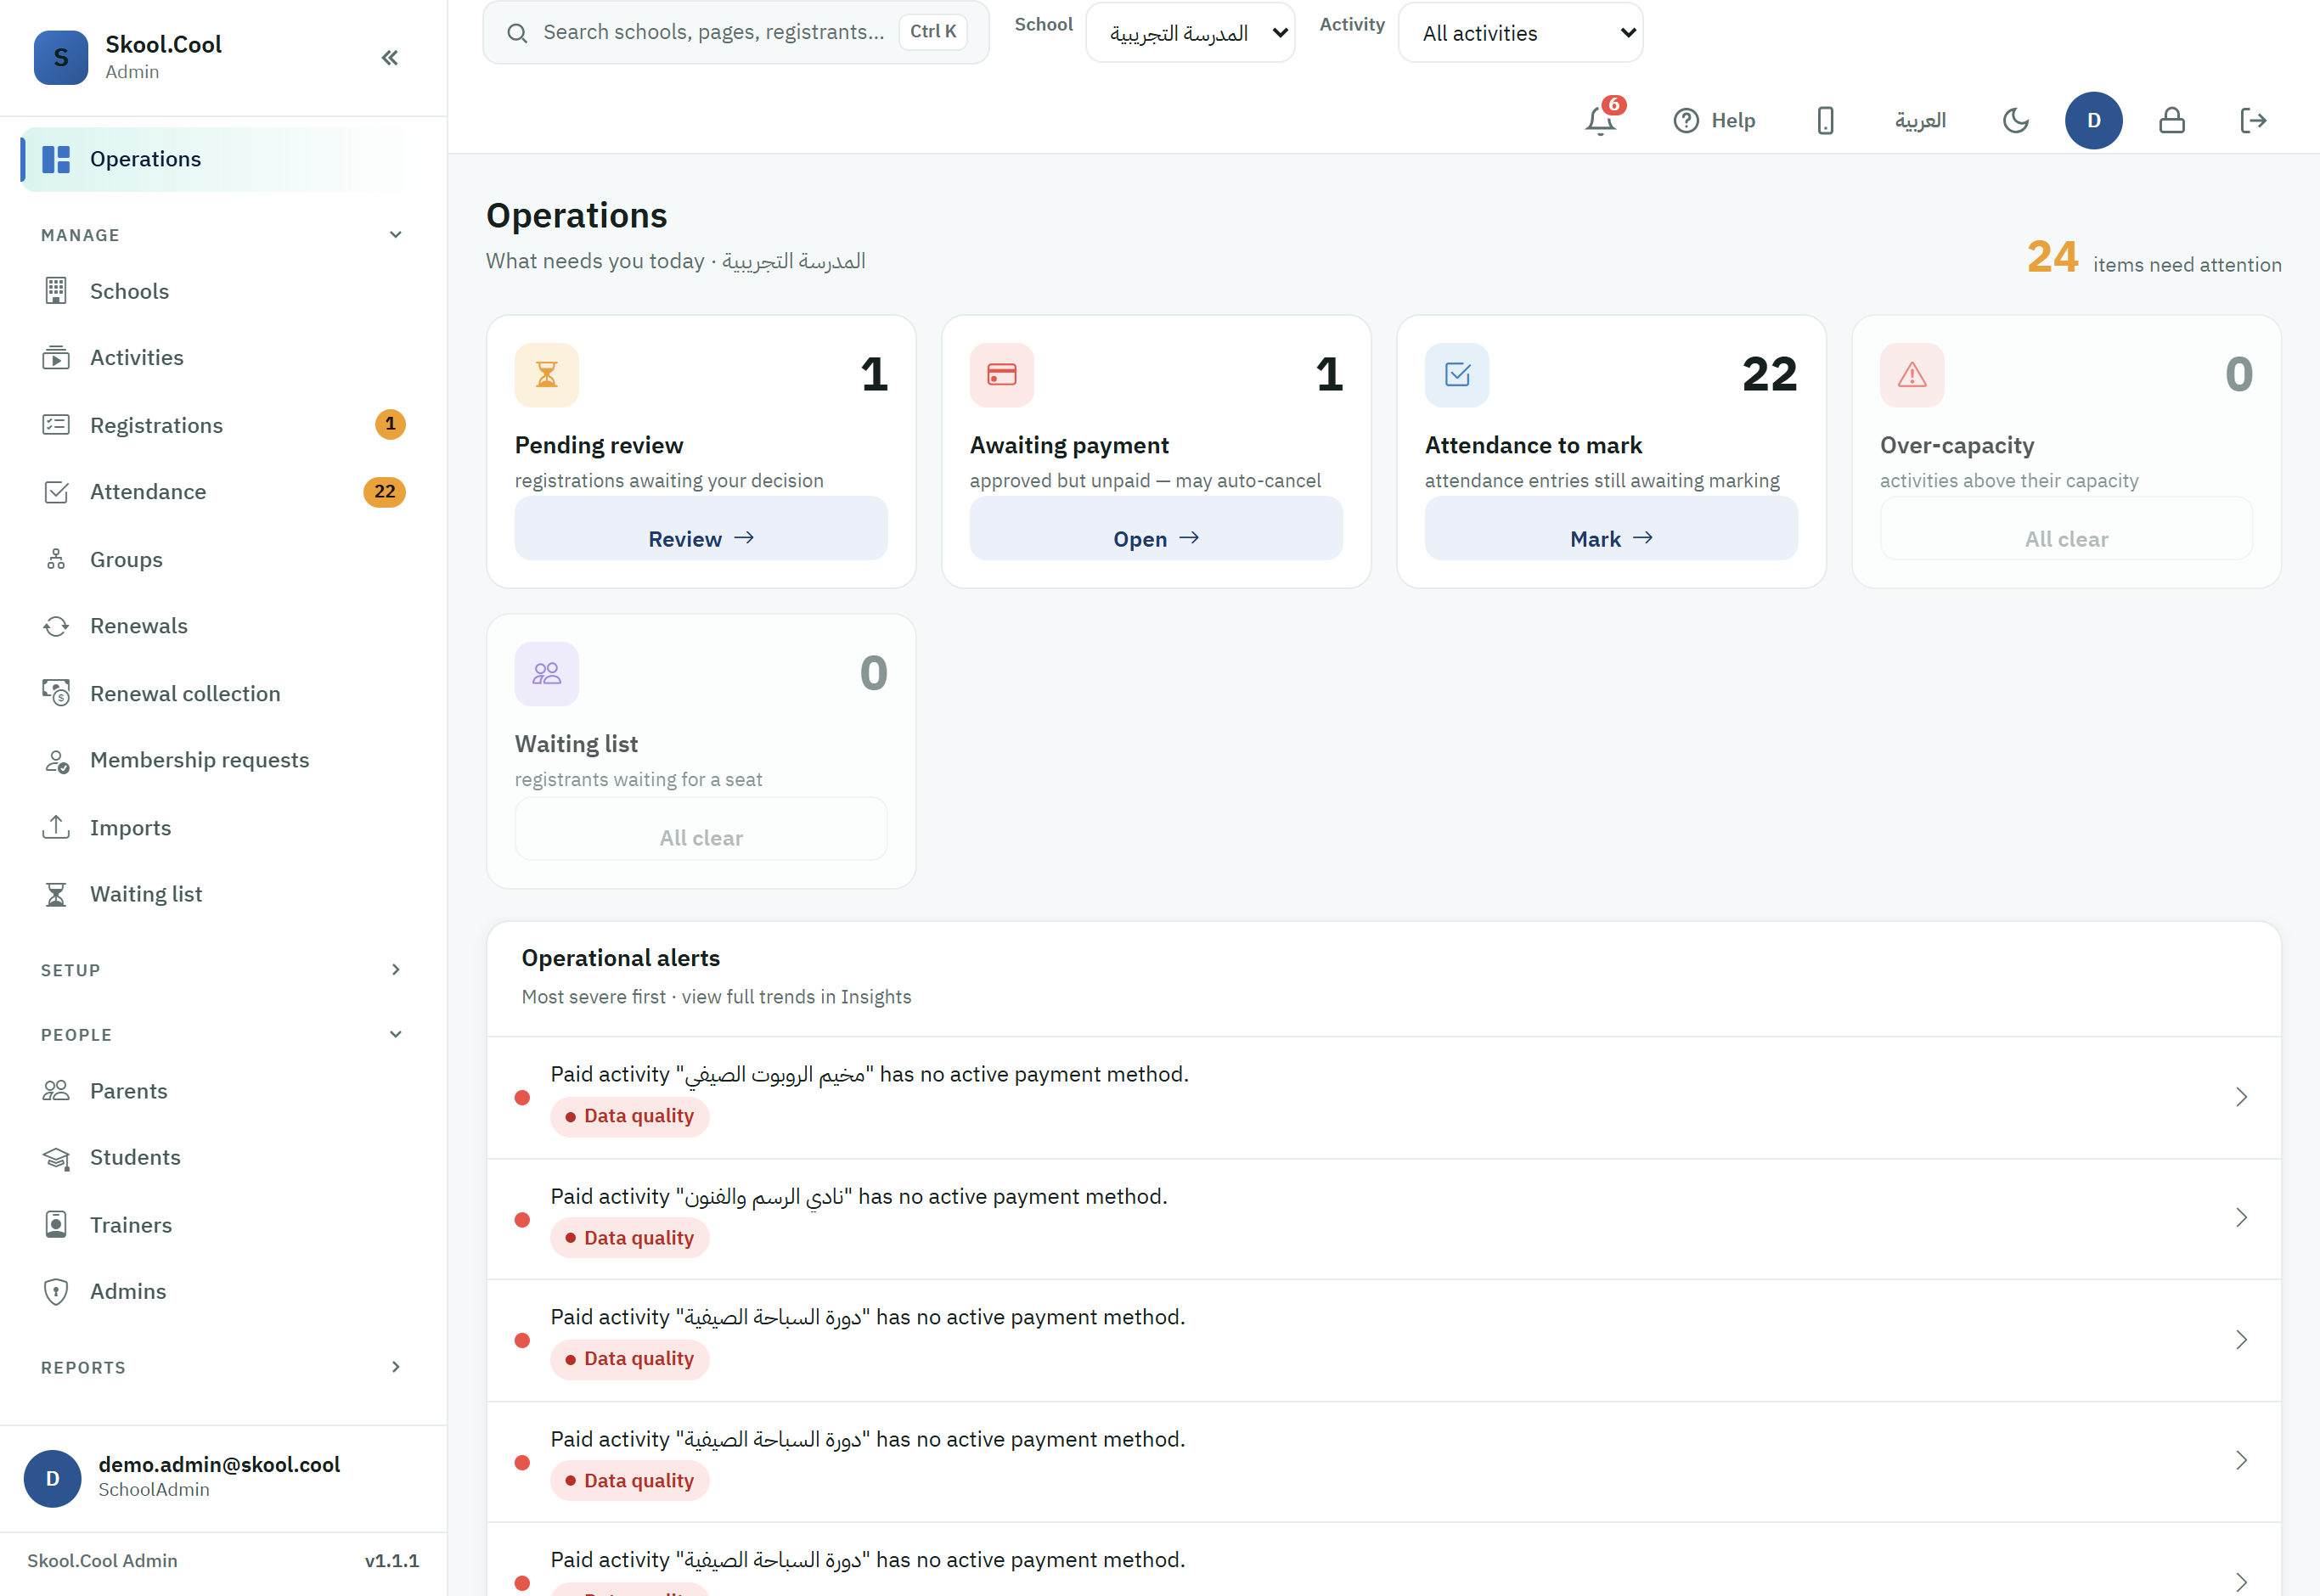
The interface is a top bar, a sidebar grouped into sections, and the main content area.
1. The top bar
-
Search field / command palette: it reads Search schools, pages, registrants… and opens the quick command palette with
Ctrl+K, to reach any school, page or registrant. (Unified search and registrant search happen here — they are no longer sidebar items.) -
The school switcher — the School list: a dropdown that sets the current school whose data is shown (it includes an All schools option for anyone with permission over more than one).
-
The activity filter — the Activity list: a dropdown next to the school switcher that narrows the Registrations and Attendance screens to a single activity (program), so you can focus. Choose All activities to go back to everything. It appears on desktop screens when you are working on a single school that has activities, and your choice is remembered per school. (This filter no longer affects the Groups item, which now opens a school-wide overview.)
-
The Notifications bell: shows real-time alerts (new registrations, financial updates, import reports) with a counter of unread messages. The bell is the latest alerts at a glance; the full notifications page opens from View all notifications under the bell, or from Notifications in the account menu — both open the same page.
-
The account menu — the initial of your name at the end of the bar: open it for your name and role, and everything that belongs to you rather than to the school:
- Notifications — the full notifications page · My requests — your request-desk tickets · Change password.
- Language — the interface is bilingual and shows Arabic by default; the row displays the name of the other language (English in the Arabic interface, العربية in the English one) and switches to it.
- Appearance — switches between Light mode and Dark mode.
- Log out.
NoteThese used to be separate buttons in the top bar, and Notifications and My requests used to be sidebar items. They are all in one place under your account icon now: the sidebar is for the places you work, the account menu is for what belongs to you. The menu is available on mobile exactly as it is on desktop.
2. The sidebar — grouped into sections
Items appear according to your permissions (anything you lack permission for is not shown). Operations is pinned on its own at the top with no section heading, and then the following sections follow:
- Operations (pinned at the top): the operational home page — what needs you today.
- Today's work — every list that is waiting for an action, in operating order. Starts open.
- Registrations · Attendance · Renewals · Membership requests · Imports · Waiting list.
- This is the group you work in during a shift: every item in it represents work waiting for you, which is why these are the items that carry badges (pending-work counters).
- The Waiting list item opens the school-wide waiting list screen: everyone waiting for a seat across all activities, ordered oldest first, with search and filtering by activity. It works as soon as a school is selected and does not need an activity chosen in the top bar, and it opens on current activities only. A badge on it shows how many people are waiting. The single-activity view is still available from the activity header inside Registrations.
- Who sees it? Anyone able to view the school waiting list — today granted to the same roles that can see a single activity's waiting list: SchoolAdmin, ActivityAdmin, Coordinator, Cashier and SupportReadOnly. Seeing it does not mean being able to admit from it: admitting is governed by the add-to-waiting-list ability alone, so the payment desk and read-only roles can see the queue without admitting from it. Details in the capability matrix.
- The Renewals item is one page with two tabs: Collection — the tab it opens on, and the one the badge counts — and Programs due. The old renewal-collection link still works and opens the Collection tab directly, so no saved link is lost.
- A badge on the Membership requests item shows how many requests are waiting for review at the school you are working in. Only an admin with permission to view membership at that school sees the number, and it counts that school only, not the whole platform.
- Programs — the programs themselves and what belongs to them (no work queues). Starts open.
- Activities · Groups · Weekly plans.
- The Groups item opens the school groups overview: the groups of every program in the school and their placement status on one screen, from which you can move to placement for any program. It works as soon as a school is selected and does not need an activity chosen in the top bar.
- People — starts open.
- Parents · Students · Trainers · Admins.
- Reports — a collapsible group that starts collapsed
- Executive overview · Dashboard · Schedule conflicts · Trainer follow-up. (Revenue is coming.)
- Trainer follow-up appears only in schools where the screen has been switched on, and only to those with permission to view it. See Trainer follow-up.
- Setup — a collapsible group that starts collapsed (settings you configure once and rarely reopen)
- Registration questions · Bundles · Branding · Grade levels.
- Platform — a collapsible group that starts collapsed. This group used to be called System.
- Schools · Roles & permissions · Explain access · School policies · Request desk · Support sessions. (Settings is coming.)
- Most items here are visible only to platform accounts. Schools is visible to anyone able to view the schools list — today granted to four school-scoped roles: SchoolAdmin, Coordinator, Cashier and SupportReadOnly — not to platform accounts alone, and it moved here because it is not daily work. Switching the branch you are working on is done from the school switcher in the top bar, not from this item. Details in the capability matrix.
The sidebar was regrouped so that sections follow the kind of work instead of mixing everything into one Manage group. No item was removed, and no item was renamed — every row you used is still there under its own name. What changed is the GROUPS around them: one was split and one was renamed.
| Was | Now |
|---|---|
| Manage (9 items) | split into Today's work (what is waiting for an action) and Programs (activities, groups, plans) |
| Schools, inside Manage | inside Platform |
| System | renamed Platform |
All of your saved links still work, and the collapse state you had chosen is preserved and carried over to the two new groups automatically.
Confirming payment is not a separate menu item — payment actions (confirm cash, switch to online) happen inside the Registrations screen on each registration, not from a separate item. See the Payments chapter.
Collapsing sections to save space
- Every titled section is collapsible. Today's work, Programs and People start open (your daily working space), while Reports, Setup and Platform start collapsed. Click any section heading to collapse or open it, and your choice is remembered.
- No group that carries badges starts collapsed. Any group holding work that is waiting for you starts open, so pending work can never hide behind a collapsed section.
- When you collapse a section that contains items awaiting action, a counter of those items appears on the collapsed heading, so no outstanding work goes missing just because the items are hidden.
- Collapsing the whole sidebar (on desktop): the Collapse sidebar button at the top of the menu shrinks it to a narrow icon rail to widen the content area; while collapsed, item names appear as tooltips on hover, and your choice is remembered. This works on desktop screens only; on mobile the menu opens as a full sliding overlay as usual.
- Appearance: the sidebar follows the interface theme — a light background in Light mode and a dark one in Dark mode.
Operations home
The first thing you land on is the Operations page — an operational board titled What needs you today that summarises what the current school needs:
- A counter at the top of everything requiring action (for example, "79 items need attention").
- Triage cards, each with a direct action button:
- Pending review — registrations waiting for your decision.
- Awaiting payment — approved but unpaid (and liable to be cancelled automatically).
- Attendance to mark — attendance entries still waiting to be taken.
- Over-capacity — activities that have exceeded their capacity.
- Waiting list — registrants waiting for a seat.
- Operational alerts — a list with the most serious first (the alert type plus how overdue it is), with the detailed analysis in the Reports group.
For the full details, see Operations home.
The school switcher (the School list in the top bar)
Skool.Cool runs several schools (branches) at once, and the school switcher decides which branch's data is shown and which one your actions apply to:
- When you pick a school, the system updates the active school, remembers your choice, and takes you to that branch's data — to the same section you were in where possible, and otherwise to the Dashboard — or, if your role cannot open the Dashboard, to the first page it can open at that school. If you are on a tabbed page such as Renewals, the open tab stays open.
- If your account covers only one school, the switcher cannot be changed.
- Anyone with permission over more than one school gets an All schools option, which steps outside a single branch and opens a view across every school (the Schools screen).
You can also switch schools quickly from the command palette (Ctrl+K) by typing part of the school's name.
Real-time alerts and connection status
Alerts reach you as they happen, with no need to refresh the page:
- A red dot or counter over the Notifications bell when a new registration request or a financial update arrives; you can Mark all read or View all notifications.
- On a weak network the icon switches to Reconnecting notifications…, and the system restores the connection automatically without a page reload, so no alerts are missed.
Frequently asked questions
How do I reach a page or a school quickly without hunting through the menu?
Open the command palette with Ctrl+K from anywhere and type the name of the page, school or registrant. Details in The command palette.
Why do some sidebar items not appear for me? The menu shows only what your permissions allow, and anything you lack permission for is not shown. See the differences in Roles and permissions.
How do I change which school I am working on? Pick the branch from the School list in the top bar; the working context updates and that branch's data is shown straight away. If you manage more than one branch, choose All schools for a view across everything.
Where did confirming payment go in the menu? It is no longer a separate item; carry out payment actions (confirm cash, switch to online) inside the Registrations screen on each registration.
What is the Operations page, and why does it open first? It is Operations — the "what needs you today" board that gathers everything needing a decision or an action in one place. Start your day there, as described in Operations home.